 By Joseph Marin
Just as a pilot performs a number of system checks on the airplane before takeoff, it’s important to make sure that a print project doesn’t contain any serious errors that will prevent it from printing successfully.
Preflighting for print production is about examining all of the components that make up an eventual printed piece and comparing them against a checklist of potential known issues. If they “pass” the check, the job can move forward in the print production workflow. If they “fail,” something has to be done to correct the problem before proceeding. It is by default a methodical task that is typically performed by prepress personnel (no one wants to reprint a job because an error wasn’t found in time), but designers should also preflight their work before they send it off to their printers.
Software tools and a checklist are both critical to the preflighting process. Some of the things that a typical preflight checklist helps you examine:
- Layout issues: Does the physical size of the layout match the specifications? Are all page elements there? Was the job created with a professional desktop publishing application? Are bleed elements there? Do graphic elements abut (will there be white gaps between objects)? Are any of the rules set to a thickness of “hairline,” or are they made up of a screen build?
- Fonts: Are they supplied/embedded properly? What type of fonts are they? Are they from a valid foundry (i.e., will they RIP)? Were they menu styled? Has any type been set to a very small point size, and is small type made up of a screen build?
- Images: Is there sufficient resolution for the printing or output method? Do the images contain unsightly artifacts? Is the ink density of shadow areas too high for the type of paper that the job is being printed on? Are the images compressed and, if so, by what type of compression?
- Color: How many colors are supposed to print? What color space are the images/layout objects? Is RGB color used? Are spot colors indicated correctly and consistently? Which color swatch library was used?
- Effects: Were transparency or other special effects used? Is transparency live or will it have to be flattened? Does the file contain layers? Are they all supposed to print? Are there annotations or other nonprinting objects in the file?
In addition to application preflight tools, there are also Web-based preflight and delivery tools, and PDF-creation and printer drivers that have preflighting built right in. These software-based preflight tools can detect many errors, but some problems require manual human inspection and intervention. Knowing what to look for is half the battle—that’s where the checklist comes into play. Download a Printing Industries of America sample preflight checklist that can be used by designers or in prepress; feel free to modify or change it to fit your needs specifically.
Preflight Diagnostic Tools for Designers
Preflighting tools for digital files are abundant today; there is really no excuse not to perform this necessary task. Adobe InDesign and QuarkXPress contain built-in preflight and packaging options. Adobe InDesign and Acrobat have easy-to-use diagnostic tools that can help you quickly assess and correct common print-related problems before sending the job off to the printer:
InDesign Diagnostic Tools
- Overprint Preview: It’s critical to be able to preview on-screen objects that are set to overprint to avoid potential errors on press. Overprinting is the technique often used to create trap areas between adjacent colors in order to prevent white paper gaps from showing up on press. Black text is typically set to overprint for the same reason. With Overprint Preview turned on (View>Overprint Preview), you can see how inks will interact with each other on press. If the preview shows something that isn’t how the file should print, it gives you the opportunity to repair it before sending it off to your print service provider.
- Flattener Preview: An extremely useful diagnostic tool for checking to see if fonts will be converted to outlines in Adobe InDesign (and Illustrator) is the Flattener Preview palette (Window>Output>Flattener Preview and Window>Flattener Preview, respectively). By selecting the various options under the Highlight pull-down menu, you can preview which objects are transparent on a page, which objects will be affected by transparency, and which fonts (if any) will be converted to outlines.
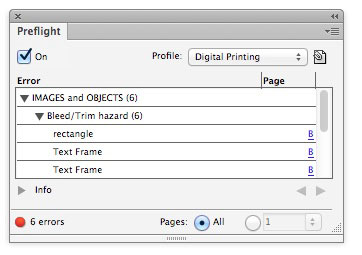
- Live Preflight: Live Preflight (Window>Output>Preflight) sounds exactly like what it is. It can be set up to alert designers to potential problems as they arise, rather than after the design is complete. When an error is detected as the design is being created, the problem can quickly be found and corrected. Live Preflight can be configured to alert you to many common file problems including low-resolution images, unwanted spot-color plates, improper image color spaces, and more.
Acrobat Diagnostic Tools
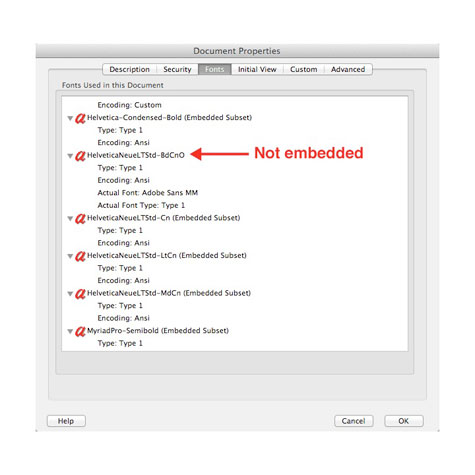
- Document Properties: The Document Properties dialog box is a great way to quickly determine how a PDF was created (File>Properties). It also contains other document information such as PDF version, security settings, and whether all fonts have been embedded. The Fonts section of the Document Properties dialog box lists all of the fonts used in the PDF file and whether or not they have been embedded. When scrolling through the list of fonts, if Embedded or Embedded Subset is not listed next to the font, then the font was not embedded in the PDF.
- Output Preview: The Output Preview tool in Acrobat Professional can be used to preview overprints and separations in a PDF. Here you can see at a glance all of the colors used in the document. Colors can be toggled on and off to show where and how they are being used in a document. Output Preview is a great way to make sure that black text is set to overprint simply by toggling the black channel on and off. If a white knockout of the text shows up when the black is turned off, it hasn’t been set to overprint. If the background color shows up solid, then the black text has been set to overprint properly. It’s also an easy way to make sure the same spot color hasn’t been specified multiple times with slightly different names. Output Preview also provides feedback on the color build of any object when the cursor is dragged over that area.
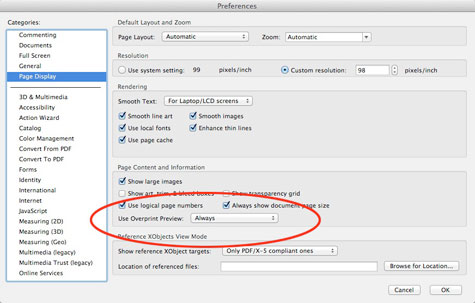
- Overprint Preview: As with InDesign, Overprint Preview shows how inks will interact with each other on press. If the preview shows something that isn’t how the file should print, it gives you the opportunity to repair it before sending it off to your print service provider. Overprint Preview is turned off by default (both in Acrobat and the free Adobe Reader) and must be activated in the preferences of each application. Select Acrobat (or Reader) (Preferences>General). Next, select Page Display from the list. In the Use Overprint Preview pull-down menu, choose Always.
—————
 Joseph Marin is senior instructor/manager of training programs for the Printing Industries of America, and is one of the industry’s leading voices on digital technologies, including all things related to succeeding in a digital print environment. He is also the lead instructor in the best-selling Printing Industries of America workshop, “Orientation to the Graphic Arts,” and develops custom training programs for major industry manufacturers and suppliers. Marin is the author of the “Prepress Skills Training Program,” “Process Control Primer,” “Digital Prepress Primer,” and co-author of “The PDF Print Production Guide,” all published by Printing Industries Press.