By Sabine Lenz
Something was distinctly different. I couldn’t put my finger on it. Was it the size of the magazine? Nope. Maybe the page count? Nein. The paper? Something was different, but …
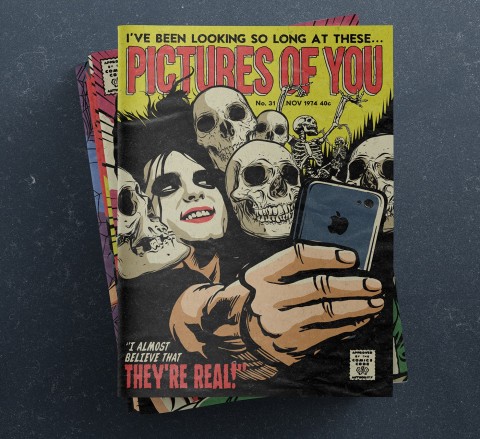
Then it hit me: the latest issue of Fine Arts magazine, the magazine for the fine arts museums of San Francisco, was somehow bulkier around the middle and didn’t look as sophisticated as it used to.
The difference: After years of perfect bound, coffee-table-worthy editions, I had received a saddled-stitched issue – a cheap imitation of its old self.
Now there are perfectly good reasons why the museums would have switched to saddle stitching. For one, it is less expensive; and secondly…it is less expensive 😉
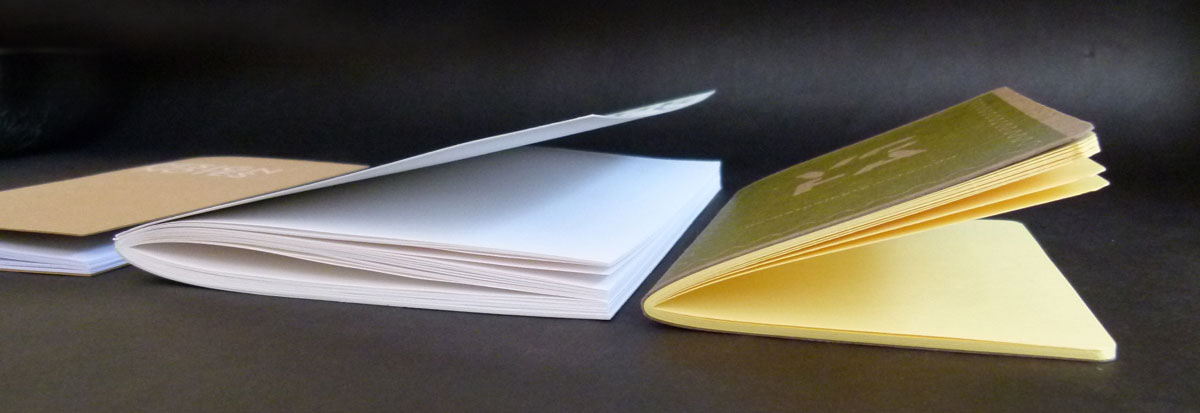
The downside, though, is that it also looks the part, and at 48 pages, showed the distinct tendency to not lie completely flat when closed – sometimes referred to as a “bow” in the middle. Think of the bowing as love handles 😉
How to Know When to …
Even though it might look like a brochure or catalog is made from a stack of loose pages, usually multiple pages are printed on a much larger sheet – the signature – which, when folded, fall in order and become part of your catalog or brochure.
Many times the method of binding will be determined by the page count. You will commonly hear the “under 48 always stitch” and “over 96 perfect bind” rules of thumb.
But what rule applies to catalogs and booklets that fall between 48 and 96 pages? Does the rule of thumb always apply?
Saddle Stitching
Saddle stitching is simply a printer’s term for stapling. 😉 Printed, folded forms are opened at their centers (half the pages on one side and half on the other side) and then gathered or nested together – each form falling on top of the next in proper order while riding along a chain.

By the time the gathered signatures reach the end of this moving conveyor style line, they are stitched with wire (stapled) while resting on top of what looks like a metal saddle. The final step is to trim the excess paper away along three sides (top, face and bottom) leaving the final finished size.
The Workhorse of Binding Techniques
Saddle stitching is the most basic, inexpensive and commonly accepted form of binding for periodicals, booklets, catalogs, etc. The pages are printed, saddle stitched and then trimmed to size.
Starting with as little as eight pages, this form of binding is suitable for brochures made of the same weight sheets inside and out (self covers) as well as those that have a thicker cover and thinner inside text pages (plus cover).
That Creeping Feeling that Something’s Not Right
If you take a close-up look at a brochure bound this way, you will notice something very distinct.
“In saddle stitching, the inside pages of the book are a bit narrower than the outside pages,” explains Stuart Slater, director of business development at Contemporary Graphics.
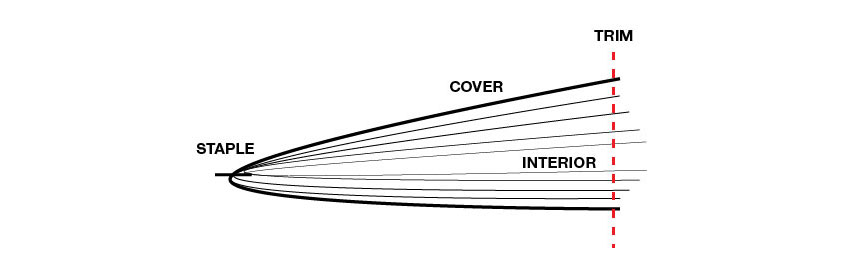
Understanding the Impact of Creep on Saddle Stitching
Imagine saddle stitching a magazine that is 48 pages with the pages being 8.5 inches wide left to right (or bound edge to opposite side unbound edge). After the binding signatures have been nested one inside the next, the center-most pages, 24 and 25 in this example, will stick out the furthest beyond the front and back cover. This “creep” happens because the bulk of the paper along the folded edge to be stitched takes up space and “pushes out” the inside pages. The heavier the paper and the higher the page count, the more pronounced the effect.
Ensuring a Flawless Trim with Proper Adjustments
When the bindery goes to make that final trim, all the pages need to end up being flush along the face (the face is the open front edge of the stitched piece). That means that pages 24 and 25 will end up being narrower than the final trim size of 8.5. How much narrower, again, depends on the weight of the paper and the number of pages to be saddle stitched.
“This is especially challenging when the design features tight registering borders, pages that spread across the spine or bleeds. (Imagine page numbers designed to appear right next to the face trim edge.) Many designers are not aware of this and don’t allow for the creep,” explains Slater.
To avoid some of these stitching pitfalls, the printer can calculate the adjustment you need to make when creating your files or offer suggestions on adjusting the design elements.
Advantages of Saddle Stitching
– Least expensive of all binding options
– Fast
– Widely available, as most printers saddle stitch in-house
– Lies relatively flat
– Special gatefolds and foldouts are possible
– Can use a self-cover or a separate cover
Limitations of Saddle Stitching
– Longevity. The wire stitching takes its toll on the paper and is not recommended for pieces intended for heavy use.
– Limited amount of paper variations within the piece. For example, if you are stitching two 16-page forms together to create a 32-page self-cover brochure, and you want pages 3 and 4 to be red paper, then pages 1 though 8 and 25 through 32 will also be red paper. (There are other ways of configuring this 32-page brochure of course, but the idea here is that what happens on the front side of that form will also affect the back side of the form.)
– No printable spine
– Thickness limitations. Documents thicker than .125 to .25 inch may require another binding technique.
– May require special design adjustments for creep, especially small formats with high page counts
Perfect Binding
Perfect binding is commonly used for catalogs, directories and paperback books that have a higher page count. Pages are glued together at the spine with a strong, flexible glue. The cover is wrapped around the glued pages, and the brochure or catalog is then trimmed to its finished size.

The Price for Perceived Value
Undoubtedly, the finished piece is aesthetically more pleasing. And, as this process provides you with an actual spine, you can use this extra design real estate to print on.
But this more refined look comes at a price.
“Never forget that every piece we print is custom made,” remarks Slater. “There are so many variables to each project, and it is hard to give exact price points.”
But we are trying to give you an idea of what to expect for this more valuable look. On average you can expect to add 10%-15% to your print cost.
Not such a big deal in smaller runs perhaps, but when we are talking many thousands of pieces, this may become prohibitive.

Advantages of Perfect Binding
– Overall valuable look and appeal
– Printable spine
– Longevity
– Ability to creatively interleaf pages. Use a variety of paper weights, colors and finishes nearly anywhere you like.
Limitations of Perfect Binding
– Does not lay flat. You lose design space in the gutter area. Not suggested for applications in which hands-free reading is important (e.g., cookbooks or instruction manuals)
– Recommended thickness:
Minimum: .125 inch (if spine is printed) or .0625 inch if spine isn’t printed.
Maximum: 2.25 inches
– Turnaround time. Even though both binding processes are done automatically, allow an extra day for perfect binding.
There are two binding processes that “simulate” perfect binding and might come in handy for smaller print runs or when gutter space is important to you: lay flat and side stitching.
When to Choose Each Technique
“When you have different alternatives that are available to you, the best thing to do is to work with a print vendor and allow him/her to run the numbers,” recommends Slater. “Good print vendors today are partners of their design clients. And working together to solve potential problems or obstacles is really what it is all about.”
You might be amazed at the ideas that can be sparked.
As for my Fine Arts magazine with 48 pages, it was in that in-between category and started to bow out. Perfect binding definitely would have been the way to go here.


Saddle stitching allows a binder to produce a hardcover editing with sewn signatures, because it does not destroy the paper. The perfect bound versiion contains cheap glue that will not age well, break, distort the paper in wavy fashion if the paper grain is wrong, and only take gluing in future binding efforts.
IMHO nothing of value should use perfect biding. It doesn’t open properly, reading hurts the binding, and future binding efforts to produce volumes are doomed to waste a part of the page and also use glue. As an example, if comics were using perfect bidning instead of saddle stitching, they would be in terrible shape. Nothing from a few decades back would be in perfect shape, and you would’t be able to bind those that are worth less in volumes.
I find it ridiculous that you think the method of binding cheap paperbacks and magazines meant to be recycled is a good binding method.
Thanks for your comment, Otis. While cheap paperbacks might be perfect bound, so are a myriad of fabulous books, brochures and coffee table books.
Yeah, no. The only way a coffee table book doesn’t fall apart with ‘perfect’ bonding is if no one ever opens it (which is sort of the point of a coffee table book, but I digress.)
There is literally no reason to ever use this style of binding unless you:
1) Don’t care about it lasting (brochures and the like), or
2) Your goal is to force your readers to buy the book again after a short period of normal use.
The first factor to consider when choosing saddle stitch vs. perfect binding is the page count. 42 to 48 pages, is when we recommend perfect binding, otherwise the pages might bulge out.
The second factor is paper thickness, which can range from 60# text to 100# text for the inside. For the cover, it can be 80# cover to 100# cover or even 14PT. That all will come into play on the type of binding one should choose for their project.
I agree with the quote ““Good print vendors today are partners of their design clients,” as that is what the company we worked with Printleaf.com strived to do with us. Their goal was to guide us through the process and make sure we are happy with the outcome.
You can check them out here
http://www.printleaf.com/products/catalogs-digital
Another thing to keep in mind when choosing whether to perfect bind or saddle stitch your project is page count. When Saddle Stitching, page count needs to be in multiples of 4. Meaning, If you have a 19-page file you will need to either add 1 page or remove 3. This is due to the way saddle stitching books are created. Perfect binding, on the other hand, does not have this requirement.
For more information about saddle-stitching:
https://www.ddprinting.net/saddle-stitching/
Embroidery
This is very simple, but so effective! I love the design and I will definitely make one for myself:) Have a nice day
Nicely written details on Saddle stitching vs Binding. I will go with saddle stitch for my presentation now as I was looking for option and I was earlier settling for perfect binding but if it does not lay flat, its of no use to me. Thanks for sharing. I was actually looking for some information and comparison on the web.
So happy to have been of some help, Sasha 🙂
Thank you for sharing such an insightful article. I would also like to add that the saddle stitched books can have a look and feel of perfect bound book by adding an extra finishing process of square spine. There are many alternatives available in the market today.
Thank you for your insight, Amey!
I have a 120 page (60 SHEET) photo book and want it on 100lb. glossy. I also have a sample of the binding from another photo book that I think would be good. That is, divide the book into several sections and perfect bind each one. Then perfect bind the sections together.
The result is a book with heavy paper which will open more or less flat without stressing the glue or pulling out the pages.
I don’t know what this is called, but does it sound like something you would do?
Hi Dave – that sounds like an interesting project you have going there. As to your last question, I’m afraid we don’t do binding or printing ourselves. We provide information to our members on paper, printing, finishing and binding to designers, as well as swatchbooks, personal advice and more. You can find more information about that here: https://www.paperspecs.com/membership-sign-up/ Many thanks for writing 🙂
Great work
There are pros and cons to both methods of binding book covers. Saddle stitching is traditionally seen as being more durable than perfect binding, but it can be more time-consuming. Perfect binding is less expensive than saddle stitching, but it may not be as durable.
Thank you for sharing such an informative blog. It helps me to clear all my concepts about perfect binding vs. saddle stitching. This article is a valuable resource for readers seeking to learn more about perfect binding and saddle stitching.
Thank you for sharing such valuable insights on perfect binding versus saddle stitching! This blog has greatly enhanced my understanding of these binding techniques, offering a clear and detailed comparison. For anyone looking to deepen their knowledge in this area, this article is an exceptional resource.
Great post! I never realized how important the choice between perfect binding and saddle stitching could be for the final look and feel of a printed piece. Your tips on when to use each method were super helpful!
Great insights! I never considered the structural differences between perfect binding and saddle stitching before. Your tips on choosing based on project needs were super helpful. Thanks for breaking it down so clearly!
Amazing post! I had no idea how crucial the choice between saddle stitching and perfect binding could be for how a printed piece looks and feels in the end. Your suggestions for when to use each technique were extremely helpful!
Great breakdown of perfect binding vs. saddle stitching. It’s amazing how much the binding method can impact a piece’s look and feel. Just like quality design matters in print, Custom Digitizing for Embroidery plays a big role in embroidery precision. The same level of detail applies when creating embroidery digitizing patches; structure and finish are everything. Whether it’s print or stitch, careful execution makes all the difference. Thanks for the insight; it’s a great read for both designers and embroidery professionals!