 Sometimes even we are amazed at the level of detail some of our webinar presenters go into when it comes to the fascinating world of printing and finishing techniques and effects. Here are six tips by two experts in their chosen fields, covering everything from engraving and die cutting to reticulation and strike through.
3 Print Effects to Wow Any Audience
If you feel like you’ve slipped into a routine of design, print, repeat, yawn, here are three special print effects that can wow the pickiest client, even as those techniques rekindle your own excitement for print design. These tips come to us courtesy of the eloquent Daniel Dejan, North American Print/Creative Manager for Sappi Fine Paper, and his PaperSpecs webinar Print’s Special Effects Magic. (PRO members, check out that webinar in its entirety here. Not a member? Why not begin your PRO membership today?)
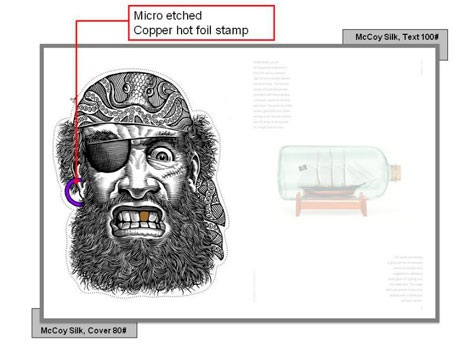
1. Thermography. Thermography has been around for a really long time; unfortunately it has also gotten a really bad rap. First of all, it is not the “poor man’s engraving.” It is a technique unto itself that is a whole lot of fun. For a start, you have this beautiful faux emboss that happens. Here’s how it works. It’s printed, the granules are attached to it, and it goes through a heat line, which inflates the little granules to create that raised surface with the pigment. Finally it goes through a cooling line. Thermography comes in every color and it’s also coordinated to the Pantone system. This beautiful illustration of the pirate shows you exactly that wonderful etching feel you get. It is quite raised so it gives you that scratch board or scrimshaw feel to it… More >>
3 Tips for Special Print Techniques
Sometimes a truly special project calls for a truly special printing technique, and that’s when you’d really appreciate a few pointers from people who know those techniques inside and out. The following tips come to us from Vanessa Kreckel, owner and creative director of design studio Two Paper Dolls and her PaperSpecs webinar, Design With Special Print Techniques, alongside then-creative director Greg Ash. (PRO members, check out that webinar in its entirety here. Not a member? Why not begin your PRO membership today?)
1. Engraving. When we do engraved projects, we love to do them with dark paper and lighter ink because it’s really the only way that you can achieve that look, where you can lay ink on top of paper and have it be so vibrant. You could create the same design and just offset the entire thing, but you’d have no texture and no dimension to the project.
You also want to avoid large areas of ink coverage if possible. If you do use a large area of coverage in engraving, it’s going to screen, so it’s going to end up being very tiny dots… More >>