 By Michael Schwartz
At a time when digital design tools and modern paper choices give you nearly limitless options for coming up with killer business cards, wedding invitations and more, it’s easy to lose sight of one process that is as relatively simple as it is eye catching. In the hands of an expert printer, edge painting can add a subtle touch of elegance to even the humblest marketing materials and fine art projects.
The Process
The edge-painting process takes place after all the graphics and text have been printed and all paper materials cut down to size. For this example, we’re focusing on a recent business card project. I like to make sure my blade is especially nice and sharp when trimming cards that are going to be edge painted.
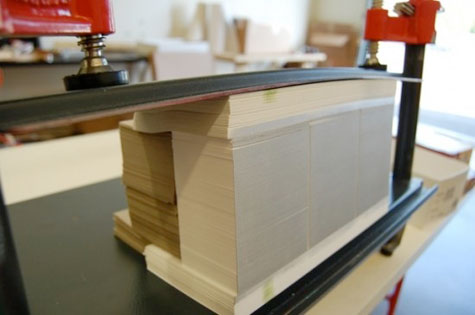
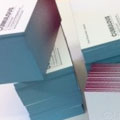
Edge painting involves a padding press (pictured above), ink and a brayer.
1. Stack the cards on the padding press, ensuring that they are pressed against one wall of the press as evenly as possible.
2. Crank down the vises on the press, applying pressure to the cards, making them nice and snug.
3. Remove the outer wall of the padding press, leaving one side exposed. This is the side that will receive the ink.
4. Using just a little bit of ink, ink up your brayer. (Roll the brayer around and around on a piece of glass if possible to make the ink spread evenly across the brayer roller.)
5. Apply the ink to the exposed side of the card using as little pressure as possible with the brayer to get good ink coverage on the cards. (Once the ink has been applied, I like to gently wipe down the inked side of the cards with a cotton cloth to remove any excess ink.)
6. Let them dry for a while – maybe an hour, depending on conditions – until they are dry to the touch. Put the outer wall back on the padding press, spin the cards around to the next side, and repeat until all sides are complete.
 Tips
Tips
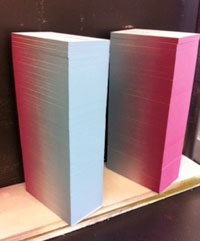
Most printers recommend thicker papers – usually 160 lb. and up – for maximum results with edge painting. Edge painting can be done on thinner paper, but heavier (thicker) paper weights will better show the color and saturation of the ink color.
Similarly, most letterpress printers recommend darker or more saturated colors for edge painting. Think bright red, cobalt blue, or even bright neon or metallic foils! As with any custom process, most printers hand mix inks to match a specific Pantone color, so keep in mind that there may be slight variations in tone and saturation depending on the number of cards being painted.
————
 Michael Schwartz is the owner (czar) of Czar Press, a full-service print shop specializing in wholesale and commercial printing for stationers, designers, agencies, and even some other print shops. They make their own film and photopolymer plates and offer letterpress printing, flat printing, diecutting, scoring, duplexing, edge painting, and some other good stuff. Their shop currently consists of four letterpresses: Chandler (a 12 x 18 C&P), Ivan (a 10 x 15 hand-feed Kluge), Boris (a 10 x 15 auto-feed Kluge) and Demetri (a 10 x 15 Windmill). They also have a little nursery for Michael’s little one, Piper. They welcome visitors to come and check out their operation if you’re ever in Irvine, Calif. in Orange County.